Config
Once Jekyll is running, you can start with basic configuration by adding various entries to _config.yml. Besides the documentation here, you can also read the annotated config file.
When making changes to _config.yml, it is necessary to restart the Jekyll process for changes to take effect.
- Setting
urlandbaseurl - Changing accent colors and sidebar images
- Changing fonts
- Choosing a blog layout
- Adding an author
- Enabling comments
- Enabling Google Analytics
- Changing built-in strings
- Adding legal documents
- Enabling math blocks
- Adding custom Favicons and App Icons
- Adding a cookies banner*
- Enabling newsletter boxes*
- Enabling Dark Mode
Setting url and baseurl
The first order of business should be to set the correct url and baseurl values in _config.yml.
The url is the domain of your site, including the protocol (http or https). For this site, it is
# file: `_config.yml`
url: https://qwtel.com
You don’t need to provide this property when hosting on GitHub Pages or Netlify.
If your entire Jekyll blog is hosted in a subdirectory of your page, provide the path in baseurl with a leading /, but no trailing /, e.g.
# file: `_config.yml`
baseurl: /hydejack
Otherwise, provide the empty string ''
You don’t need to provide this property when hosting on GitHub Pages or Netlify.
GitHub Pages
When hosting on GitHub Pages the url is https://<username>.github.io (unless you are using a custom domain).
The baseurl depends on the kind of page you are hosting.
- When hosting a user or organization page, use the empty string
''. - When hosting project page, use
/<reponame>.
For for information on the types of pages you can host on GitHub, see the GitHub Help article.
Changing accent colors and sidebar images
Hydejack allows you to choose the background image of the sidebar, as well as the accent color (color of the links, selection and focus outline, etc…).
# file: `_config.yml`
accent_image: /assets/img/sidebar-bg.jpg
accent_color: rgb(79,177,186)
I recommend using a blurred image in order for the text to remain readable. If you save a blurred image as JPG, it will also drastically reduce its file size.
The accent_image property also accepts the special value none which will remove the default image.
If your sidebar image contains bright colors, the white text can be difficult to read. In this case, consider setting invert_sidebar: true in the front matter to invert the text colors in the sidebar. Use front matter defaults to enable this on all pages (see below).
Note that these values can be overwritten on a per-page basis, i.e. you can create a unique look for each page. You can also apply a certain look to all posts in a category via front matter defaults, e.g.:
# file: `_config.yml`
defaults:
  - scope:
      path:         hydejack/
    values:
      accent_image: /assets/img/hydejack-bg.jpg
      accent_color: rgb(38,139,210)
Theme color
Hydejack also supports the theme_color property. When set, it will change the background color of the sidebar, as well as set the theme_color property in the Web App Manifest. In some browsers, such as Chrome on Android, this will change the color of the browser’s UI components.
# file: `_config.yml`
theme_color:  rgb(25,55,71)
Just like accent_* properties, the theme color can be overridden on a per-page basis by setting it in the front matter.
Changing fonts
Hydejack lets you configure the font of regular text and headlines, and it has built-in support for Google Fonts. There are three keys in _config.yml associated with this: font, font_heading and google_fonts. The defaults are:
# file: `_config.yml`
font:         Noto Sans, Helvetica, Arial, sans-serif
font_heading: Roboto Slab, Helvetica, Arial, sans-serif
google_fonts: Roboto+Slab:700|Noto+Sans:400,400i,700,700i
font and font_heading must be valid CSS font-family values. When using Google Fonts make sure to provide at least one fallback.
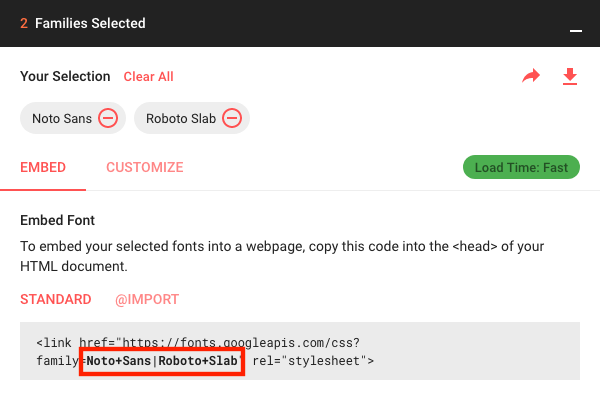
The google_fonts key is the string necessary to fetch the fonts from Google. You can get it from the download page at Google Fonts after you’ve selected one or more fonts:
Removing Google Fonts
If you prefer not to use Google Fonts and remove all associated code from the site, set the google_fonts key to false.
The no_google_fonts parameter has been removed in v9 and no longer has any effect.
Choosing a blog layout
Hydejack features three layouts for showing your blog posts.
- The
listlayout only shows the title and groups the posts by year of publication. - The
gridlayout* is exclusive to the PRO Version and will show a content card (withimage) for each post. - The
bloglayout is a traditional paginated layout and shows the title and an excerpt of each post.
In order to use the list or grid layout add the following front-matter to a new markdown file:
---
layout: list # or `grid`
title:  Home
---
If you want to use the blog layout, you need to add jekyll-paginate to your Gemfile and to the plugins list in your config file:
# file: `Gemfile`
gem "jekyll-paginate"
# file: `_config.yml`
plugins:
  - jekyll-paginate
You also need to add the paginate and paginate_path keys to your config file, e.g.
# file: `_config.yml`
paginate:      10
paginate_path: '/:num/'
The blog layout needs to be applied to a file with the .html file extension and the paginate_path needs to match the path to the index.html file. To match the paginate_path above, put a index.html with the following front matter in the root directory:
# file: `index.html`
---
layout: blog
title: Blog
---
For more information see Pagination.
Using the blog layout in a subdirectory
If you want to use the blog layout at a URL like /my-blog/, create the following folder structure:
├── my-blog
│   └── index.html
└── _config.yml
You can use the same index.html as before and place it in the subdirectory.
# file: `my-blog/index.html`
---
layout: blog
title: Blog
---
In your config file, make sure the paginate_path matches the name of the subdirectory:
# file: `_config.yml`
paginate:      10
paginate_path: /my-blog/:num/ #!!
To add an entry in the sidebar to your blog directory, see Adding an entry to the sidebar.
Adding an author
At a bare minimum, you should add an author key with a name and email sub-key (used by the feed plugin) to to your config file:
# file: `_config.yml`
author:
  name:  Florian Klampfer
  email: [email protected]
If you would like the author to be displayed in the about section below a post or project*, add an about key and provide markdown content. I recommend using the YAML pipe | syntax, so you can include multiple paragraphs:
# file: `_config.yml`
author:
  name:  Florian Klampfer
  email: [email protected]
  about: |
    Hi, I'm Florian or @qwtel...

    This is another paragraph.
Adding an author’s picture
If you’d like for the author’s picture to appear in addition the about text (see above), you can either use the jekyll-avatar plugin or provide URLs to images manually.
To use the plugin, add it to your Gemfile and the list of plugins in your config file:
# file: `Gemfile`
gem "jekyll-avatar"
# file: `_config.yml`
plugins:
  - jekyll-avatar
Run bundle install for the changes to take effect.
Make sure you have provided a GitHub username in your config file (github_username), or to the author key (author.social.github, author.github.username, or author.github). See Adding social media icons for more.
To set an image manually, you have to provide an URL to the author’s picture key:
# file: `_config.yml`
author:
  picture:  /assets/img/me.jpg
If you’d like to provide multiple versions for screens with different pixel densities, you can provide path and srcset keys instead:
# file: `_config.yml`
author:
  picture:
    path:   /assets/img/me.jpg
    srcset:
      1x:   /assets/img/me.jpg
      2x:   /assets/img/[email protected]
The keys of the srcset hash will be used as image descriptors. For more information on srcset, see the documentation at MDN, or this article from CSS-Tricks.
Adding social media icons
Hydejack supports a variety of social media icons out of the box. These are defined on a per-author basis, so make sure you’ve followed the steps in Adding an author.
If you are using the gem-based version of Hydejack, download social.yml and put it into _data in the root directory. This is necessary because gem-based themes do not support including _data.
You can add a link to a social network by adding an entry to the social key in to an author. It consists of the name of the social network as key and your username within that network as value, e.g.
# file: `_config.yml`
author:
  social:
    twitter: qwtel
    github:  qwtel
Check out authors.yml to see which networks are available. You can also follow the steps here to add your own social media icons.
You can change the order in which the icons appear by moving lines up or down, e.g.
# file: `_config.yml`
author:
  social:
    github:  qwtel # now github appears first
    twitter: qwtel
To get an overview of which networks are available and how a typical username in that network looks like, see the included authors.yml.
Should providing a username not produce a correct link for some reason, you can provide a complete URL instead, e.g.
# file: `_config.yml`
author:
  social:
    youtube: https://www.youtube.com/channel/UCu0PYX_kVANdmgIZ4bw6_kA
You can add any platform, even if it’s not defined in social.yml, by providing a complete URL. However, a fallback icon will be used when no icon is available. Supplying your own icons is an advanced topic.
Adding an email, RSS icon or download icon
If you’d like to add an email , RSS , or download icon to the list, add the email, rss, or download key, e.g.:
# file: `_config.yml`
author:
  social:
    email:    [email protected]
    rss:      https://hydejack.com/feed.xml # make sure you provide an absolute URL
    download: https://github.com/hydecorp/hydejack/archive/v9.2.1.zip
Enabling comments
Hydejack supports comments via Disqus. Before you can add comments to a page you need to register and add your site to Disqus’ admin console. Once you have obtained your “Disqus shortname”, you include it in your config file:
# file: `_config.yml`
disqus: <disqus shortname>
Now comments can be enabled by adding comments: true to the front matter.
---
layout:   post
title:    Hello World
comments: true
---
You can enable comments for entire classes of pages by using front matter defaults. E.g. to enable comments on all posts, add to your config file:
# file: `_config.yml`
defaults:
  - scope:
      type: posts
    values:
      comments: true
Enabling Google Analytics
Enabling Google Analytics is as simple as setting the google_analytics key.
# file: `_config.yml`
google_analytics: UA-XXXXXXXX-X
To remove Google Analytics and all associated code from the site, set the google_analytics key to false.
Using a custom analytics provider
If you want to use a different analytics provider such as Matomo, you can add its code snippet to _includes/my-body.html (create if it doesn’t exist). The default file contains an example.
Changing built-in strings
You can change the wording of built-in strings like “Related Posts” or “Read more” in _data/strings.yml.
If you are using the gem-based version the file doesn’t exist, but you can get the default file here.
You will frequently find markers like <!--post_title-->. You can place them freely within your string and they will be replaced with the content they refer to.
You may also use this feature to translate the theme into different languages. In this case you should also set the lang key to your config file, e.g.
# file: `_config.yml`
lang: cc-ll
where cc is the 2-letter country code and ll specifies a 2-letter location code, e.g.: de-at.
You may also change the strings used for formatting dates and times (look out for the date_formats key), but be aware that the values you provide need to be valid Ruby format directives.
Adding legal documents
If you have pages for contact data, privacy policy, cookie policy, etc. you can add links to them in the footer by listing them under the legal key in your config file as follows:
# file: `_config.yml`
legal:
  - title: Impress
    url:  /impress/
  - title: Cookies Policy
    url:  /cookies-policy/
When using Hydejack’s offline feature, the pages listed here will be downloaded and cached when loading the page for the first time.
Enabling math blocks
Hydejack supports math blocks with either KaTeX or MathJax.
The MathJax implementation comes with a client-side runtime and works on GitHub Pages. It is the more heavy-weight of the two and doesn’t work without JavaScript enabled. Due to the size of the complete MathJax package, it only works partially with offline support enabled.
The KaTeX implementation pre-renders the KaTeX output during site building. It’s more lightweight because it does not ship a client-side runtime and therefore works without JavaScript. In my opinion, it is the more elegant solution, but it requires a JavaScript runtime on the machine that builds the site, i.e. it does not work on GitHub Pages.
You can switch between the two implementations by changing the kramdown.math_engine key to either katex or mathjax in your config file.
# file: `_config.yml`
kramdown:
  math_engine:         katex
  math_engine_opts:    {}
The KaTeX implementation also requires the kramdown-math-katex gem in your Gemfile. If you intend to use MathJax instead, this step is not required.
# file: `Gemfile`
gem "kramdown-math-katex"
There are a couple of things to know about this gem:
- It is not supported on GitHub Pages. You have to build the site on your machine before uploading to GitHub, or use a more permissive cloud building tool such as Netlify.
- You need some kind of JavaScript runtime on your machine. Usually installing NodeJS will suffice. Alternatively, adding
gem "duktape"will also do. For more, see https://github.com/kramdown/math-katex#documentation
Before you add math content, remember to run bundle install and restart Jekyll.
Adding custom Favicons and App Icons
Changing the Favicon
By default, Hydejack will use the Favicon from /assets/icons/favicon.ico and Apple Touch Icon from /assets/icons/icon-192x192.png. You can either override these files, or override the path in the config file via favicon and app_touch_icon keys:
# file: "_config.yml"
favicon: /favicon.ico
apple_touch_icon: /assets/img/logo.png
Changing the App Icons
By default, Hydejack includes its own favicon, as well as app icons in 8 different resolutions.
| Name | Resolution |
|---|---|
icon-512x512.png | 512x512 |
icon-384x384.png | 384x384 |
icon-192x192.png | 192x192 |
icon-152x152.png | 152x152 |
icon-144x144.png | 144x144 |
icon-128x128.png | 128x128 |
icon-96x96.png | 96x96 |
icon-72x72.png | 72x72 |
To change the default icons you have to replce all of them. To make this manageable, I recommend using the following tools:
First, use the Maskable.app Editor to confine your logo/picture to the “minimum safe area”. More on maskable app icons, see this article on web.dev. Make sure the base image is at least 512x512 pixels in size.
Then use the Web App Manifest Generator to automatically resize the icons. Upload the icon downloaded from Maskable.app and then click “Generate .zip”. In the zip, ignore the manifest.json and look for the icons folder. Copy it into the assets folder of your site.
To change the favicon, place your own favicon.ico (32x32, PNG) into assets/icons.
Adding a cookies banner*
# file: `_config.yml`
hydejack:
  cookies_banner: true
Enabling this setting will show a notice at the top of the page to new visitors. You can change the wording of the notice in _data/strings.yml with the cookies_banner.text and cookies_banner.okay keys:
# file: `_data/strings.yml`
cookies_banner:
  text: This site uses cookies. [Markdown allowed](/cookies-policy/)!
  okay: Okay
Enabling newsletter boxes*
If want to use a different mailing provider you can build your own form, and insert it into _includes/my-newsletter.html. The file includes an example form for MailChimp, where you need to fill in site.mailchimp.action and site.mailchimp.hidden_input (you can get these from MailChimp).
To build a completely new from, you can use the same CSS classes as Bootstrap. Note that only form, grid and utility classes are available. Check out Forms by Example for more examples.
Enabling Dark Mode
Dark mode can be enabled in config.yml under the hydejack key and has three settings and two adjustments:
# file: `_config.yml`
hydejack:
  dark_mode:
    dynamic: true
    icon:    true
    always:  false
Setting dynamic will enable dark mode based on the client’s device setting, as expressed by the prefer-color-scheme CSS media query.
Setting icon will show a switch to alternate between the light and dark mode at the top of the page.
Finally, setting always will cause dark mode to become the default theme at all times (combine with dynamic: false).
Older versions of Hydejack allowed enabling dark mode based on local time. These settings continue to work, but are no longer recommended.
Continue with Basics