Documentation
Here you should be able to find everything you need to know to accomplish the most common tasks when blogging with Hydejack.
While this manual tries to be beginner-friendly, as a user of Jekyll it is assumed that you are comfortable running shell commands and editing text files.
This document was created using Hydejack’s print layout. If you prefer to read it the documentation in your browser, you can find it here.
Table of Contents
- Install
- Upgrade
- Config
- Setting
urlandbaseurl - Changing accent colors and sidebar images
- Changing fonts
- Choosing a blog layout
- Adding an author
- Enabling comments
- Enabling Google Analytics
- Changing built-in strings
- Adding legal documents
- Enabling math blocks
- Adding custom Favicons and App Icons
- Adding a cookies banner*
- Enabling newsletter boxes*
- Enabling Dark Mode
- Setting
- Basics
- Writing
- Scripts
- Build
- Deploy
- Advanced
Install
How you install Hydejack depends on whether you start a new site, or change the theme of an existing site.
- this unordered seed list will be replaced by toc as unordered list
New sites
For new sites, the best way to get started with Hydejack is via the Starter Kit. It comes with a documented config file and example content that gets you started quickly.
If you have a GitHub account, fork the Hydejack Starter Kit repository. Otherwise download the Starter Kit and unzip the contents somewhere on your machine.
If you bought the PRO Version of Hydejack, use the contents of the starter-kit folder instead.
You can now jump to running locally.
Existing sites
If you have an existing site that you’d like to upgrade to Hydejack you can install the theme via bundler. Add the following to your Gemfile:
## file: `Gemfile`
gem "jekyll-theme-hydejack"
Next, in your config file, change the theme to Hydejack:
## file: `_config.yml`
theme: jekyll-theme-hydejack
You can now jump to running locally.
PRO Customers
If you bought the PRO Version of Hydejack, copy the #jekyll-theme-hydejack folder into the root folder of your site, and add the following to your Gemfile instead:
## file: `Gemfile`
gem "jekyll-theme-hydejack", path: "./#jekyll-theme-hydejack"
The folder is prefixed with a # to indicate that this folder is different from regular Jekyll content. The # character was chosen because it is on of the four characters ignored by Jekyll by default (., _ , #, ~)
Alternatively, if you’ve been added to the “PRO Customers” team on GitHub, you can add Hydejack PRO as a git dependency instead:
## file: `Gemfile`
gem "jekyll-theme-hydejack", git: "https://github.com/hydecorp/hydejack-pro", tag: "pro/v9.2.1"
If you’ve provided your GitHub username during checkout you should have been automatically added to the team. Otherwise you can request an invite via [email protected].
In order for Bundle to fetch the private repository, an environment variable named BUNDLE_GITHUB__COM must be set to x-access-token:<GH_REPO_PAT>, where you replace <GH_REPO_PAT> with a GitHub Personal Access Token (PAT) that has the “repo” permission.
After you’ve secured a way to fetch the jekyll-theme-hydejack gem, in your config file, change the theme to Hydejack:
## file: `_config.yml`
theme: jekyll-theme-hydejack
Hydejack comes with a default configuration file that takes care most of the configuration, but it pays off to check out the annotated example config file from the Starter Kit to see what’s available. See chapter Config for more.
You can now jump to running locally.
Troubleshooting
If your existing site combines theme files with your content (as did previous versions of Hydejack/PRO), make sure to delete the following folders:
_layouts_includes_sassassets
The assets folder most likely includes theme files as well as your personal/content files. Make sure to only delete files that belong to the old theme!
GitHub Pages
As of September 2024, the recommended way of deploying to GitHub Pages is through a custom GitHub Action, which gives you full control over the build process. No extra steps are required when using a GH Action and you can jump to running locally, or learn more in chapter Deploy. That being said, Hydejack maintains backwards compatibility with the legacy pipeline and you can continue to use it.
If you want to build your site using the legacy pipeline, you can build off of the gh-pages branch in the Hydejack Starter Kit repo.
The main difference to the regular starter kit is the use of remote_theme setting in the config file.
## file: `_config.yml`
remote_theme: hydecorp/[email protected]
This setting only works with the Free Version of Hydejack. PRO Customers should use the starter-kit-gh-pages folder in the downloaded zip file when targeting the GitHub Pages legacy pipeline.
starter-kit-gh-pages is only required when deploying to GitHub Pages through the legacy build pipeline. When using a custom GitHub Action, the regular starter-kit provides a cleaner, less cluttered folder structure.
Make sure the plugins list contains jekyll-include-cache (create if it doesn’t exist):
## file: `_config.yml`
plugins:
  - jekyll-include-cache
To run this configuration locally, make sure the following is part of your Gemfile:
## file: `Gemfile`
gem "github-pages", group: :jekyll_plugins
Note that Hydejack has a reduced feature set when built on GitHub Pages. Specifically, using KaTeX math formulas doesn’t work when built in this way.
Running locally
Make sure you’ve cded into the directory where _config.yml is located. Before running for the first time, dependencies need to be fetched from RubyGems:
$ bundle install
If you are missing the bundle command, you can install Bundler by running gem install bundler.
Now you can run Jekyll on your local machine:
$ bundle exec jekyll serve
and point your browser to http://localhost:4000 to see Hydejack in action.
Upgrade
This chapter shows how to upgrade Hydejack to a newer version. The method depends on how you’ve installed Hydejack.
- this unordered seed list will be replaced by toc as unordered list
Before upgrading to v7+, make sure you’ve read the CHANGELOG, especially the part about the license change!
Free version
Upgrading the free version of the theme is as easy as running
bundle update jekyll-theme-hydejack
PRO Version
In v9, the structure of Hydejack PRO sites has changed. If you’re looking to upgrade from v8 or earlier, check out Installation for existing sites instead.
Buyers of the PRO version will find the files necessary for an upgrade in the #jekyll-theme-hydejack folder of the downloaded zip archive. To upgrade, simply overwrite the existing theme folder in the root directory of your site with the new one, then run
bundle update jekyll-theme-hydejack
If you’ve modified any of Hydejack’s files in #jekyll-theme-hydejack, your changes will most likely be overwritten and you have to apply them again. Make sure you’ve made a backup before overwriting any files.
If you’ve followed the steps to add Hydejack PRO as a git dependency, all you have to do is change the tag to the latest version:
## file: `Gemfile`
gem "jekyll-theme-hydejack", git: "https://github.com/hydecorp/hydejack-pro", tag: "pro/v9.2.1"
Note that you can also define a git dependency based on a branch, which removes the need for manual updates:
## file: `Gemfile`
gem "jekyll-theme-hydejack", git: "https://github.com/hydecorp/hydejack-pro", branch: "pro/v9"
GitHub Pages
When building on GitHub Pages, upgrading Hydejack is as simple as setting the remote_theme key in _config.yml to the desired version.
remote_theme: hydecorp/[email protected]
To use the latest version on the v9 branch on each build, you can use hydecorp/hydejack@v9.
This setting only works with the Free Version of Hydejack. PRO Customers must carefully merge contents of the starter-kit-gh-pages folder in the downloaded zip with their existing files. See Deploy for a better way to use GitHub Pages, which also works with the PRO version.
Config
Once Jekyll is running, you can start with basic configuration by adding various entries to _config.yml. Besides the documentation here, you can also read the annotated config file.
When making changes to _config.yml, it is necessary to restart the Jekyll process for changes to take effect.
- this unordered seed list will be replaced by toc as unordered list
Setting url and baseurl
The first order of business should be to set the correct url and baseurl values in _config.yml.
The url is the domain of your site, including the protocol (http or https). For this site, it is
## file: `_config.yml`
url: https://qwtel.com
You don’t need to provide this property when hosting on GitHub Pages or Netlify.
If your entire Jekyll blog is hosted in a subdirectory of your page, provide the path in baseurl with a leading /, but no trailing /, e.g.
## file: `_config.yml`
baseurl: /hydejack
Otherwise, provide the empty string ''
You don’t need to provide this property when hosting on GitHub Pages or Netlify.
GitHub Pages
When hosting on GitHub Pages the url is https://<username>.github.io (unless you are using a custom domain).
The baseurl depends on the kind of page you are hosting.
- When hosting a user or organization page, use the empty string
''. - When hosting project page, use
/<reponame>.
For for information on the types of pages you can host on GitHub, see the GitHub Help article.
Changing accent colors and sidebar images
Hydejack allows you to choose the background image of the sidebar, as well as the accent color (color of the links, selection and focus outline, etc…).
## file: `_config.yml`
accent_image: /assets/img/sidebar-bg.jpg
accent_color: rgb(79,177,186)
I recommend using a blurred image in order for the text to remain readable. If you save a blurred image as JPG, it will also drastically reduce its file size.
The accent_image property also accepts the special value none which will remove the default image.
If your sidebar image contains bright colors, the white text can be difficult to read. In this case, consider setting invert_sidebar: true in the front matter to invert the text colors in the sidebar. Use front matter defaults to enable this on all pages (see below).
Note that these values can be overwritten on a per-page basis, i.e. you can create a unique look for each page. You can also apply a certain look to all posts in a category via front matter defaults, e.g.:
## file: `_config.yml`
defaults:
  - scope:
      path:         hydejack/
    values:
      accent_image: /assets/img/hydejack-bg.jpg
      accent_color: rgb(38,139,210)
Theme color
Hydejack also supports the theme_color property. When set, it will change the background color of the sidebar, as well as set the theme_color property in the Web App Manifest. In some browsers, such as Chrome on Android, this will change the color of the browser’s UI components.
## file: `_config.yml`
theme_color:  rgb(25,55,71)
Just like accent_* properties, the theme color can be overridden on a per-page basis by setting it in the front matter.
Changing fonts
Hydejack lets you configure the font of regular text and headlines, and it has built-in support for Google Fonts. There are three keys in _config.yml associated with this: font, font_heading and google_fonts. The defaults are:
## file: `_config.yml`
font:         Noto Sans, Helvetica, Arial, sans-serif
font_heading: Roboto Slab, Helvetica, Arial, sans-serif
google_fonts: Roboto+Slab:700|Noto+Sans:400,400i,700,700i
font and font_heading must be valid CSS font-family values. When using Google Fonts make sure to provide at least one fallback.
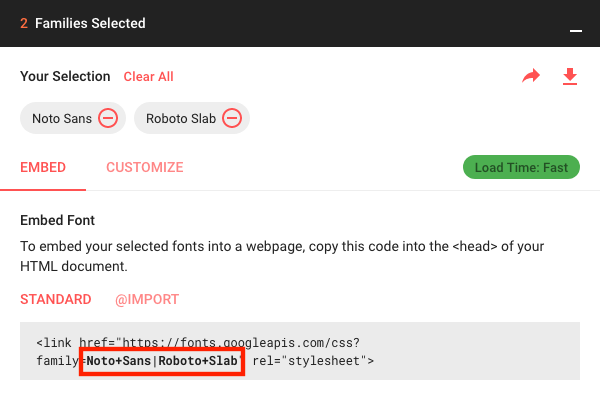
The google_fonts key is the string necessary to fetch the fonts from Google. You can get it from the download page at Google Fonts after you’ve selected one or more fonts:
Removing Google Fonts
If you prefer not to use Google Fonts and remove all associated code from the site, set the google_fonts key to false.
The no_google_fonts parameter has been removed in v9 and no longer has any effect.
Choosing a blog layout
Hydejack features three layouts for showing your blog posts.
- The
listlayout only shows the title and groups the posts by year of publication. - The
gridlayout* is exclusive to the PRO Version and will show a content card (withimage) for each post. - The
bloglayout is a traditional paginated layout and shows the title and an excerpt of each post.
In order to use the list or grid layout add the following front-matter to a new markdown file:
---
layout: list # or `grid`
title:  Home
---
If you want to use the blog layout, you need to add jekyll-paginate to your Gemfile and to the plugins list in your config file:
## file: `Gemfile`
gem "jekyll-paginate"
## file: `_config.yml`
plugins:
  - jekyll-paginate
You also need to add the paginate and paginate_path keys to your config file, e.g.
## file: `_config.yml`
paginate:      10
paginate_path: '/:num/'
The blog layout needs to be applied to a file with the .html file extension and the paginate_path needs to match the path to the index.html file. To match the paginate_path above, put a index.html with the following front matter in the root directory:
## file: `index.html`
---
layout: blog
title: Blog
---
For more information see Pagination.
Using the blog layout in a subdirectory
If you want to use the blog layout at a URL like /my-blog/, create the following folder structure:
├── my-blog
│   └── index.html
└── _config.yml
You can use the same index.html as before and place it in the subdirectory.
## file: `my-blog/index.html`
---
layout: blog
title: Blog
---
In your config file, make sure the paginate_path matches the name of the subdirectory:
## file: `_config.yml`
paginate:      10
paginate_path: /my-blog/:num/ #!!
To add an entry in the sidebar to your blog directory, see Adding an entry to the sidebar.
Adding an author
At a bare minimum, you should add an author key with a name and email sub-key (used by the feed plugin) to to your config file:
## file: `_config.yml`
author:
  name:  Florian Klampfer
  email: [email protected]
If you would like the author to be displayed in the about section below a post or project*, add an about key and provide markdown content. I recommend using the YAML pipe | syntax, so you can include multiple paragraphs:
## file: `_config.yml`
author:
  name:  Florian Klampfer
  email: [email protected]
  about: |
    Hi, I'm Florian or @qwtel...

    This is another paragraph.
Adding an author’s picture
If you’d like for the author’s picture to appear in addition the about text (see above), you can either use the jekyll-avatar plugin or provide URLs to images manually.
To use the plugin, add it to your Gemfile and the list of plugins in your config file:
## file: `Gemfile`
gem "jekyll-avatar"
## file: `_config.yml`
plugins:
  - jekyll-avatar
Run bundle install for the changes to take effect.
Make sure you have provided a GitHub username in your config file (github_username), or to the author key (author.social.github, author.github.username, or author.github). See Adding social media icons for more.
To set an image manually, you have to provide an URL to the author’s picture key:
## file: `_config.yml`
author:
  picture:  /assets/img/me.jpg
If you’d like to provide multiple versions for screens with different pixel densities, you can provide path and srcset keys instead:
## file: `_config.yml`
author:
  picture:
    path:   /assets/img/me.jpg
    srcset:
      1x:   /assets/img/me.jpg
      2x:   /assets/img/[email protected]
The keys of the srcset hash will be used as image descriptors. For more information on srcset, see the documentation at MDN, or this article from CSS-Tricks.
Adding social media icons
Hydejack supports a variety of social media icons out of the box. These are defined on a per-author basis, so make sure you’ve followed the steps in Adding an author.
If you are using the gem-based version of Hydejack, download social.yml and put it into _data in the root directory. This is necessary because gem-based themes do not support including _data.
You can add a link to a social network by adding an entry to the social key in to an author. It consists of the name of the social network as key and your username within that network as value, e.g.
## file: `_config.yml`
author:
  social:
    twitter: qwtel
    github:  qwtel
Check out authors.yml to see which networks are available. You can also follow the steps here to add your own social media icons.
You can change the order in which the icons appear by moving lines up or down, e.g.
## file: `_config.yml`
author:
  social:
    github:  qwtel # now github appears first
    twitter: qwtel
To get an overview of which networks are available and how a typical username in that network looks like, see the included authors.yml.
Should providing a username not produce a correct link for some reason, you can provide a complete URL instead, e.g.
## file: `_config.yml`
author:
  social:
    youtube: https://www.youtube.com/channel/UCu0PYX_kVANdmgIZ4bw6_kA
You can add any platform, even if it’s not defined in social.yml, by providing a complete URL. However, a fallback icon will be used when no icon is available. Supplying your own icons is an advanced topic.
Adding an email, RSS icon or download icon
If you’d like to add an email , RSS , or download icon to the list, add the email, rss, or download key, e.g.:
## file: `_config.yml`
author:
  social:
    email:    [email protected]
    rss:      https://hydejack.com/feed.xml # make sure you provide an absolute URL
    download: https://github.com/hydecorp/hydejack/archive/v9.2.1.zip
Enabling comments
Hydejack supports comments via Disqus. Before you can add comments to a page you need to register and add your site to Disqus’ admin console. Once you have obtained your “Disqus shortname”, you include it in your config file:
## file: `_config.yml`
disqus: <disqus shortname>
Now comments can be enabled by adding comments: true to the front matter.
---
layout:   post
title:    Hello World
comments: true
---
You can enable comments for entire classes of pages by using front matter defaults. E.g. to enable comments on all posts, add to your config file:
## file: `_config.yml`
defaults:
  - scope:
      type: posts
    values:
      comments: true
Enabling Google Analytics
Enabling Google Analytics is as simple as setting the google_analytics key.
## file: `_config.yml`
google_analytics: UA-XXXXXXXX-X
To remove Google Analytics and all associated code from the site, set the google_analytics key to false.
Using a custom analytics provider
If you want to use a different analytics provider such as Matomo, you can add its code snippet to _includes/my-body.html (create if it doesn’t exist). The default file contains an example.
Changing built-in strings
You can change the wording of built-in strings like “Related Posts” or “Read more” in _data/strings.yml.
If you are using the gem-based version the file doesn’t exist, but you can get the default file here.
You will frequently find markers like <!--post_title-->. You can place them freely within your string and they will be replaced with the content they refer to.
You may also use this feature to translate the theme into different languages. In this case you should also set the lang key to your config file, e.g.
## file: `_config.yml`
lang: cc-ll
where cc is the 2-letter country code and ll specifies a 2-letter location code, e.g.: de-at.
You may also change the strings used for formatting dates and times (look out for the date_formats key), but be aware that the values you provide need to be valid Ruby format directives.
Adding legal documents
If you have pages for contact data, privacy policy, cookie policy, etc. you can add links to them in the footer by listing them under the legal key in your config file as follows:
## file: `_config.yml`
legal:
  - title: Impress
    url:  /impress/
  - title: Cookies Policy
    url:  /cookies-policy/
When using Hydejack’s offline feature, the pages listed here will be downloaded and cached when loading the page for the first time.
Enabling math blocks
Hydejack supports math blocks with either KaTeX or MathJax.
The MathJax implementation comes with a client-side runtime and works on GitHub Pages. It is the more heavy-weight of the two and doesn’t work without JavaScript enabled. Due to the size of the complete MathJax package, it only works partially with offline support enabled.
The KaTeX implementation pre-renders the KaTeX output during site building. It’s more lightweight because it does not ship a client-side runtime and therefore works without JavaScript. In my opinion, it is the more elegant solution, but it requires a JavaScript runtime on the machine that builds the site, i.e. it does not work on GitHub Pages.
You can switch between the two implementations by changing the kramdown.math_engine key to either katex or mathjax in your config file.
## file: `_config.yml`
kramdown:
  math_engine:         katex
  math_engine_opts:    {}
The KaTeX implementation also requires the kramdown-math-katex gem in your Gemfile. If you intend to use MathJax instead, this step is not required.
## file: `Gemfile`
gem "kramdown-math-katex"
There are a couple of things to know about this gem:
- It is not supported on GitHub Pages. You have to build the site on your machine before uploading to GitHub, or use a more permissive cloud building tool such as Netlify.
- You need some kind of JavaScript runtime on your machine. Usually installing NodeJS will suffice. Alternatively, adding
gem "duktape"will also do. For more, see https://github.com/kramdown/math-katex#documentation
Before you add math content, remember to run bundle install and restart Jekyll.
Adding custom Favicons and App Icons
Changing the Favicon
By default, Hydejack will use the Favicon from /assets/icons/favicon.ico and Apple Touch Icon from /assets/icons/icon-192x192.png. You can either override these files, or override the path in the config file via favicon and app_touch_icon keys:
## file: "_config.yml"
favicon: /favicon.ico
apple_touch_icon: /assets/img/logo.png
Changing the App Icons
By default, Hydejack includes its own favicon, as well as app icons in 8 different resolutions.
| Name | Resolution |
|---|---|
icon-512x512.png | 512x512 |
icon-384x384.png | 384x384 |
icon-192x192.png | 192x192 |
icon-152x152.png | 152x152 |
icon-144x144.png | 144x144 |
icon-128x128.png | 128x128 |
icon-96x96.png | 96x96 |
icon-72x72.png | 72x72 |
To change the default icons you have to replce all of them. To make this manageable, I recommend using the following tools:
First, use the Maskable.app Editor to confine your logo/picture to the “minimum safe area”. More on maskable app icons, see this article on web.dev. Make sure the base image is at least 512x512 pixels in size.
Then use the Web App Manifest Generator to automatically resize the icons. Upload the icon downloaded from Maskable.app and then click “Generate .zip”. In the zip, ignore the manifest.json and look for the icons folder. Copy it into the assets folder of your site.
To change the favicon, place your own favicon.ico (32x32, PNG) into assets/icons.
Adding a cookies banner*
## file: `_config.yml`
hydejack:
  cookies_banner: true
Enabling this setting will show a notice at the top of the page to new visitors. You can change the wording of the notice in _data/strings.yml with the cookies_banner.text and cookies_banner.okay keys:
## file: `_data/strings.yml`
cookies_banner:
  text: This site uses cookies. [Markdown allowed](/cookies-policy/)!
  okay: Okay
Enabling newsletter boxes*
If want to use a different mailing provider you can build your own form, and insert it into _includes/my-newsletter.html. The file includes an example form for MailChimp, where you need to fill in site.mailchimp.action and site.mailchimp.hidden_input (you can get these from MailChimp).
To build a completely new from, you can use the same CSS classes as Bootstrap. Note that only form, grid and utility classes are available. Check out Forms by Example for more examples.
Enabling Dark Mode
Dark mode can be enabled in config.yml under the hydejack key and has three settings and two adjustments:
## file: `_config.yml`
hydejack:
  dark_mode:
    dynamic: true
    icon:    true
    always:  false
Setting dynamic will enable dark mode based on the client’s device setting, as expressed by the prefer-color-scheme CSS media query.
Setting icon will show a switch to alternate between the light and dark mode at the top of the page.
Finally, setting always will cause dark mode to become the default theme at all times (combine with dynamic: false).
Older versions of Hydejack allowed enabling dark mode based on local time. These settings continue to work, but are no longer recommended.
Basics
This chapter covers the basics of content creation with Hydejack.
- this unordered seed list will be replaced by toc as unordered list
Adding images
Adding good images is key to a engaging blog experience. You can provide an image attribute in in the front matter of posts, pages, and projects* that will be used by Hydejack in a variety of ways, such as header image in the blog and post layout, social media previews, cards in the gird and projects layout*, thumbnails in the search dropdown*, etc.
The image attribute will accept an URL to an image, but it is recommended that you provide a path / srcset hash instead, e.g.
image:
  path:    /assets/img/projects/hyde-v2.jpg
  srcset:
    1920w: /assets/img/projects/hyde-v2.jpg
    960w:  /assets/img/projects/hyde-v2@0,5x.jpg
    480w:  /assets/img/projects/hyde-v2@0,25x.jpg
Hydejack will show the image in various sizes depending on available screen width so that no specific size will fit all. Instead, I recommend using a mipmap-like approach, providing the image in multiple sizes, each image half the width of the previous one. Since Hydejack provides an appropriate sizes attribute, the browser can chose the best image from the provided source set.
If you have ImageMagick installed, you can use the following commands to create images at 50%, 25%, and 12.5% of the original image. Other image tools will provide similar capabilities.
convert your-image.jpg -resize 50% -sampling-factor 4:2:0 -strip -quality 85 -interlace JPEG -colorspace RGB your-image@0,5x.jpg
convert your-image.jpg -resize 25% -sampling-factor 4:2:0 -strip -quality 85 -interlace JPEG -colorspace RGB your-image@0,25x.jpg
convert your-image.jpg -resize 12.5% -sampling-factor 4:2:0 -strip -quality 85 -interlace JPEG -colorspace RGB your-image@0,125x.jpg
Note that the keys in the srcset hash have to be valid “descriptors” (as defined here). In practice this means the width in pixels followed by w.
The path key is a fallback image for browsers that don’t support the srcset attribute. It’s also used by jekyll-seo-tag for social media previews.
For more information on srcset, see the documentation at MDN, or this article from CSS-Tricks.
Adding an entry to the sidebar
To add links to the sidebar, populate the menu entry in _config.yml with a list of title-url pairs, e.g.:
## file: `_config.yml`
menu:
  - title: Blog
    url:   /blog/
  - title: Projects
    url:   /projects/
  - title: Resume
    url:   /resume/
  - title: About
    url:   /about/
Adding a link to an external page to the sidebar
To add links to external sites, simply provide a fully qualified URL, e.g.
menu:
  - title: "@qwtel"
    url:   https://qwtel.com/
Adding a category or tag
Hydejack allows you to use the list or grid* layout to show all posts of a particular category or tag.
Before you start, make sure your config files contains the features_categories and featured_tags collections:
## file: `_config.yml`
collections:
  featured_categories:
    permalink:         /:name/
    output:            true
  featured_tags:
    permalink:         /tag-:name/
    output:            true
Recap: Categories and tags in Jekyll
Posts in Jekyll can belong to one or more categories, as well as one or more tags. They are defined in a post’s front matter:
---
layout:     post
title:      Welcome to Jekyll
categories: [jekyll, update]
tags:       [jekyll, update]
---
Posts can also be assigned to a category based on their position within the folder structure, e.g.
├── jekyll
│   └── update
│       └── _posts
│           └── 2017-04-07-welcome-to-jekyll.markdown
This will place “Welcome to Jekyll” in the categories jekyll and update.
This is now the preferred way of assigning categories in Hydejack, as it makes URLs correspond more naturally to the underlying folder structure.
Whether you use this method or not, categories will always be part of a posts URL, while tags will not.
| Type | URL |
|---|---|
| Categories | /jekyll/update/2017-04-07-welcome-to-jekyll/ |
| Tags | /2017-04-07-welcome-to-jekyll/ |
As far as Jekyll is concerned, this is the only difference.
Categories and tags in Hydejack
Categories and tags are displayed by Hydejack below the title, after the date. Categories are displayed with the preposition “in”, while tags are displayed with the preposition “on”, e.g.
| Type | Title |
|---|---|
| Categories | Welcome to Jekyll¬ 07 Apr 2017 in Jekyll / Update |
| Tags | Welcome to Jekyll¬ 07 Apr 2017 on Jekyll, Update |
| Both | Welcome to Jekyll¬ 07 Apr 2017 in Jekyll / Update on Jekyll, Update |
You can adjust these in _data/string.yml.
Creating a new category or tag
By default, categories and tags are rendered as plain text. Further steps are necessary if you want them to link to a page that contains a list of all posts that belong to that category or tag.
For each featured category or tag, a file called <category-name>.md or <tag-name>.md has to be created inside the _featured_tags and _featured_categories folders, respectively. Each file in these folders is part of a Jekyll Collection.
The meta data of a category or tag is set in the files front matter, e.g.
## file: `_featured_categories/hyde.md`
---
layout: list
title:  Hyde
slug:   hyde
description: >
  Hyde is a brazen two-column [Jekyll](http://jekyllrb.com) theme.
  It's based on [Poole](http://getpoole.com), the Jekyll butler.
---
layout- Must either
listorgrid* title- Used as title of the page, as well as name of the category or tag as part of the line below a blog post’s title. Can be different from the name of the tag or category, as long as
slugis identical to the name. slug- Must be identical to the key used in the blog’s front matter, i.e. if you use
categories: [jekyll]theslugmust bejekyll. By default, the slug is derived from the title, but here it is recommended that you set it explicitly. description- A medium-length description, used on the tag or category’s detail page and shown in a message box below the title.
menu- Set to to
trueif you want the category or tag to appear in the sidebar. For more information, see Adding an entry to the sidebar.
Once the file is created, the page can be found at /category/<categoryname>/ or /tag/<tagname>/.
Adding an about page
About pages are a frequent use case, so Hydejack has a special layout for it. It is a slight modification of the page layout that allows showing the author information by adding the <!--author--> marker somewhere on the page.
To create an about page, make sure layout is set to about. For more on authors, see Adding an author.)
<!-- file: `about.md` -->
---
layout: about
title:  About
---

Some content

<!--author-->
Adding a cover page
Hydejack 8 introduces cover pages, i.e. pages witht he sidebar opened, so that it spans the entire screen. This feature is intended for landing pages. To enable it on a page, simply add cover: true to the front matter.

## file: `index.md`
---
layout: welcome
title:  Welcome
cover:  true #!! Add this
---
Adding related posts to a post
You can choose which posts will appear in the “Related Posts” section below a post by adding the related_posts key to the front matter of a post
## file: `category/_posts/2020-02-01-some-post.md`
---
layout: post
related_posts:
  # Specify via the path in the file system
  - category/_posts/2020-01-01-other-post.md
  # Can also use the url of the post,
  # but this will break when changing the `permalink` setting!
  - /blog/category/2020-01-02-other-other-post/
---
Customization
Adding custom CSS
The quickest and safest way to add custom CSS to Hydejack is via the _sass/my-inline.scss and _sass/my-style.scss files (create the folder/the files if they don’t exist).
To add CSS that gets inlined into the page, i.e. is loaded with the first request, put the CSS rules into my-inline.scss. This is intended for above-the-fold content. Otherwise put the CSS rules into my-style.scss. Note that this distinction has no effect when no_inline_css is enabled.
Adding custom HTML to the head
To add custom HTML elements to the <head> of the document, open _includes/my-head.html (create the folder/the files if they don’t exist) and add your elements there.
For example, you can add a custom tracking script via:
<!-- file: "_includes/my-head.html" -->
<script defer data-domain="my-domain.com" src="https://plausible.io/js/plausible.js"></script>
Adding custom HTML to the body
To add custom HTML elements to the <body> of the document, open _includes/my-body.html (create the folder/the files if they don’t exist) and add your elements there.
An earlier version of Hydejack used the my-scripts.html file to accomplish the same goal. There are still some instances were you might want to prefer my-scripts.html over my-body.html, as it won’t load scrips on redirect pages and will be ignored by browsers < IE10.
Adding a welcome page*
If you bought the PRO version of Hydejack you have access to the welcome layout. It is intended to showcase your projects and blog posts in a compact way. Technically, it is a modified version of the about layout, so it allows showing the author information where the <!--author--> marker is put. Demo.
You can create a welcome page by creating a new markdown file and setting the layout to welcome in the front matter.
## file: `index.md`
---
layout: welcome
title:  Welcome
cover:  true
---
Without further configuration, the welcome page will just look like a regular page. However, it can be enhanced through the use of markers:
- To show the two most recent projects, add the
<!--projects-->marker to the content - To show the four most recent blog posts, add the
<!--posts-->marker to the content - (To show the five most recent blog posts in list form, add the
<!--posts_list-->marker to the content)
The welcome layout also supports selecting specific projects and posts, by adding to the front matter, e.g.:
## file: `index.md`
---
selected_projects:
  - _projects/hydejack-v6.md
  - /projects/hyde-v2/
projects_page: projects.md
selected_posts:
  - _posts/2017-05-03-javascripten.md
  - /blog/2012-02-07-example-content/
posts_page: /blog/
featured: false
---
selected_projects- A list of paths to projects that should be featured in the
<!--projects-->marker. Either provide paths relative to the main directory with no leading/, or URLs according to the schema defined inpermalink. projects_page- The path to the main projects page Either a path relative to the main directory with no leading
./, or a URL according to the schema defined inpermalink. selected_posts- A list of paths to blog posts that should be featured in the
<!--posts-->or<!--posts_list-->marker. Either provide paths relative to the main directory with no leading/, or URLs according to the schema defined inpermalink. posts_page- The path to the main posts page. Either a path relative to the main directory with no leading
./, or a URL according to the schema defined inpermalink. featured- Optional. When
true, project thumbnails will span the full width instead of half. This setting takes precedence over thefeaturedvalue of individual projects, i.e. it will apply to the entire page.
Projects*
Adding a projects page
The projects page will show all projects of a particular collection.
First, you need to make sure that you have the projects collection defined in _config.yml:
## file: `_config.yml`
collections:
  projects:
    permalink: /projects/:path/
    output:    true
Next, add a projects.md to in the root (you can adjust the name/location to match the permalink of the collection). This file has the projects layout (mind the “s” at the end) and should have a show_collection key, with the name of the collection as a value, e.g.:
## file: `projects.md`
---
layout:          projects
title:           Projects*
show_collection: projects
featured:        true
---
layout- Must be
projects. title- The title of the page. Note that this name is reused as part of each individual project page (for the link that directs back to the projects page).
show_collection- The name of the collection you want display on this page. Defaults to
projects. See Organizing Projects for detail on how to handle multiple project collections. featured- Optional. When
true, project thumbnails will span the full width, instead of only half. This setting takes precedence over thefeaturedvalue of individual projects, i.e. it will apply to the entire page.
Adding a project
Projects are organized using Jekyll Collections. Each project generates an entry on the projects layout (Demo) as well as its own detail page (Demo).
Each project is defined by a file in the _projects directory. The project’s meta information is defined in the file’s front matter. You can also add markdown content. A project’s front matter should look like:
## file: `_projects/hyde-v2.md`
---
layout:      project
title:       Hyde v2*
date:        2 Jan 2014
image:
  path:       /assets/img/projects/hyde-v2@0,25x.jpg
  srcset:
    1920w:   /assets/img/projects/hyde-v2.jpg
    960w:    /assets/img/projects/hyde-v2@0,5x.jpg
    480w:    /assets/img/projects/hyde-v2@0,25x.jpg
caption:     Hyde is a brazen two-column Jekyll theme.
description: >
  Hyde is a brazen two-column [Jekyll](http://jekyllrb.com) theme.
  It's based on [Poole](http://getpoole.com), the Jekyll butler.
links:
  - title:   Demo
    url:     http://hyde.getpoole.com
  - title:   Source
    url:     https://github.com/poole/hyde
featured:    false
---
layout- Must be set to
project date- Providing a year is the minimum requirement. Used to sort the projects.
image- A 16:9 image of the project. See Adding images for details.
caption- A short description, shown as part of each “project card” in the
projectslayout. description- A medium-length description, used on the project’s detail page as meta description and shown as message box below the image.
links- A list of
title-urlpairs that link to external resources related to this project. author- Optional. The author shown below the project, similar to posts.
featured- Optional. When
true, the project preview will span the full content width. You can use this for projects that should receive more attention. You can set/override this for an entire page, by settingfeaturedin the front matter (applies to theprojectsandwelcomelayout).
Organizing Projects
If you want to organize your projects using categories or tags, similar to the way you do with posts, the best way is to achieve this is via multiple collections. Categories and tags are reserved for posts, and adding them to collections has no effect.
The default config file comes with one projects collection predefined, but we can easily add additional collections like so:
## file: `_config.yml`
collections:
  # The default projects collection
  projects:
    permalink:         /projects/:path/
    output:            true

  # Our new projects collection
  other_projects:
    # Make sure the permalink path is different!
    permalink:         /other-projects/:path/
    output:            true
Create a new folder in the top level directory that follows the naming convention _<collection name>. In our case the name is _other_projects. In it, create collection items as shown above.
This is enough to render the project pages. To render them all on a single page, create a projects page as described above with the show_collection key set to our new collection, e.g.:
## file: "other-collection.md"
---
layout: projects
title: Other Projects*
show_collection: other_projects #!!
---
Note that the file name matches the other-projects path in the permalink we’ve defined above. This is to ensure that the directories match up.
Adding a resume*
Hydejack’s PRO version features a generalized resume layout. Demo.
It generates the resume page from a valid JSON Resume, which is good news if you already have a JSON resume. Otherwise, there are various ways of obtaining one:
- You can edit the example
resume.ymlin_datadirectly. It contains example entries for each type of entry. - You can use the visual JSON Resume Editor.
- If you have a LinkedIn profile, you can try LinkedIn to Json Résumé.
Once you have a JSON Resume, place it into _data.
To render a resume page, create a new markdown file and set the layout to resume in the front matter:
## file: `resume.md`
---
layout: resume
title:  Resume
description: >
  A short description of the page for search engines (~150 characters long).
hide_description: true
---
You can download the final resume.json (minified) from the assets folder. When running locally, you can find it at _site/assets/resume.json.
Changing the layout
You can customize the layout of the resume by rearranging the entries in the left_column and right_columns keys in the front matter, e.g.
## file: `resume.md`
---
layout: resume
left_column:
  - work
  - volunteer
  - education
  - awards
  - publications
  - references
right_column:
  - languages
  - skills
  - interests
---
Skill level icons
By default, the layout will replace certain keywords with star icons. The keywords are as follows:
| Icon | Skills | Languages |
|---|---|---|
| 3/3, Master, Expert, Senior, Professional | 5/5, Native or bilingual proficiency, Native speaker | |
| 4/5, Full professional proficiency | ||
| 2/3, Intermediate, Advanced, Amateur | 3/5, Professional working proficiency | |
| 2/5, Limited working proficiency | ||
| 1/3, Beginner, Novice, Junior | 1/5, Elementary proficiency | |
| 0/3 | 0/5, No proficiency |
If a keyword is not recognized, the provided text will be spelled out instead. To disable icons and always spell out the text, set no_skill_icons and/or no_langauge_icons to true.
## file: `resume.md`
no_language_icons: true
no_skill_icons: true
Adding a specialized resume or multiple resumes
You can add a specialized resume or multiple resumes by adding the resume YAML to the front matter under the resume key. E.g.:
## file: `resume.md`
---
layout: resume
title:  Resume
description: >
  A short description of the page for search engines (~150 characters long).
resume:
  basics:
    name: "Richard Hendricks"
    label: "Programmer"
    picture: "/assets/icons/icon.png"
  # ...
---
Downloads
You can add buttons to let readers print or download your resume in various formats. Add the following to the front matter to add all 4 buttons:
## file: "resume.md"
buttons:
  print: true
  pdf: /assets/Resume.pdf
  vcf: http://h2vx.com/vcf/<!--url-->
  json: /assets/resume.json
To remove a button remove the corresponding key from the hash.
While the resume.json is can be generated by Jekyll itself, and the vCard can be generated by an external service, the PDF needs to be pre-generated by you.
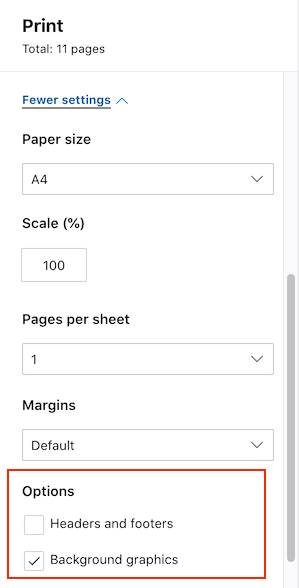
You can render a PDF from the resume page itself by using your browser’s “Print to PDF” feature (Chrome works best). For best results, check the following options in the print popup:
Writing
Hydejack offers a few additional features to markup your content. Don’t worry, these are merely CSS classes added with kramdown’s {:...} syntax, so that your content remains compatible with other Jekyll themes.
- this list will be replaced by the table of contents
For an introduction to markdown in general, see Mastering Markdown and kramdown Syntax.
A word on building speeds
If building speeds are a problem, try using the --incremental flag, e.g.
bundle exec jekyll serve --incremental
From the Jekyll docs (emphasis mine):
Enable the experimental incremental build feature. Incremental build only re-builds posts and pages that have changed, resulting in significant performance improvements for large sites, but may also break site generation in certain cases.
The breakage occurs when you create new files or change filenames. Also, changing the title, category, tags, etc. of a page or post will not be reflected in pages other then the page or post itself. This makes it ideal for writing new posts and previewing changes, but not setting up new content.
Adding a table of contents
You can add a generated table of contents to any page by adding {:toc} below a list.
Markdown:
* this unordered seed list will be replaced by the toc
{:toc}
You can also create your table of contents as an ordered list (note the 1. instead of *):
1. this ordered seed list will be replaced by the toc
{:toc}
The width of the display has to be larger than 1665px for the ToC to become sticky. Otherwise, the ToC will appear where the seed list is placed in the document. To show the table of contents only on large displays (> 1665px) use the following:
* this unordered seed list will be replaced by the toc
{:toc .large-only}
A sticky table of contents will reduce the amount of space freed up by the no_break_layout: false setting.
This is necessary to ensure large code blocks or tables don’t overlap with the ToC.
Adding notes
You can add a note by adding the note class to a paragraph.
Example:
You can add a note.
Markdown:
You can add a note.
{:.note}
Edit the note key in _data/strings.yml to change the wording of the default label. To add a note with a specific label, add a title attribute:
A custom label.
{:.note title="Attention"}
A custom label.
Adding large text
You can add large text by adding the lead class to the paragraph.
Example:
You can add large text.
Markdown:
You can add large text.
{:.lead}
Adding large images
You can make an image span the full width by adding the lead class.
Example:
Markdown:
{:.lead width="800" height="100" loading="lazy"}
It is recommended to provide the dimension of the image via the width and height attributes, so that browsers can calculate the layout before the images are loaded. Combining this with the loading="lazy" attribute allows modern browsers to load the images just-in-time as the users scrolls.
Previous versions of Hydejack shipped with a custom JavaScript-based lazy loading solution, but it has been removed in v9 in favor of this more standards-based approach.
Adding image captions
You can add captions to large images by adding the figcaption class to the paragraph after the image:
An optional caption for an image.
Markdown:
{:.lead width="800" height="100" loading="lazy"}
A caption for an image.
{:.figcaption}
Adding large quotes
You can make a quote “pop out” by adding the lead class.
Example:
You can make a quote “pop out”.
Markdown:
> You can make a quote "pop out".
{:.lead}
Adding faded text
You can gray out text by adding the faded class. Use this sparingly and for information that is not essential, as it is more difficult to read.
Example:
I’m faded, faded, faded.
Markdown:
I'm faded, faded, faded.
{:.faded}
Adding tables
Adding tables is straightforward and works just as described in the kramdown docs, e.g.
| Default aligned | Left aligned | Center aligned | Right aligned |
|---|---|---|---|
| First body part | Second cell | Third cell | fourth cell |
Markdown:
| Default aligned |Left aligned| Center aligned  | Right aligned  |
|-----------------|:-----------|:---------------:|---------------:|
| First body part |Second cell | Third cell      | fourth cell    |
However, it gets tricker when adding large tables. In this case, Hydejack will break the layout and grant the table the entire available screen width to the right:
| Default aligned | Left aligned | Center aligned | Right aligned | Default aligned | Left aligned | Center aligned | Right aligned | Default aligned | Left aligned | Center aligned | Right aligned | Default aligned | Left aligned | Center aligned | Right aligned |
|---|---|---|---|---|---|---|---|---|---|---|---|---|---|---|---|
| First body part | Second cell | Third cell | fourth cell | First body part | Second cell | Third cell | fourth cell | First body part | Second cell | Third cell | fourth cell | First body part | Second cell | Third cell | fourth cell |
| Second line | foo | strong | baz | Second line | foo | strong | baz | Second line | foo | strong | baz | Second line | foo | strong | baz |
| Third line | quux | baz | bar | Third line | quux | baz | bar | Third line | quux | baz | bar | Third line | quux | baz | bar |
| Second body | Second body | Second body | Second body | ||||||||||||
| 2 line | 2 line | 2 line | 2 line | ||||||||||||
| Footer row | Footer row | Footer row | Footer row |
Tables adopts to the font size! You can decrease the size of the table by adding the smaller CSS class. Put {:.smaller} below the Markdown table, or add class="smaller" to a HTML table.
Scroll table
If the extra space still isn’t enough, the table will receive a scrollbar. It is browser default behavior to break the lines inside table cells to fit the content on the screen. By adding the scroll-table class on a table, the behavior is changed to never break lines inside cells, e.g:
| Default aligned | Left aligned | Center aligned | Right aligned | Default aligned | Left aligned | Center aligned | Right aligned | Default aligned | Left aligned | Center aligned | Right aligned | Default aligned | Left aligned | Center aligned | Right aligned |
|---|---|---|---|---|---|---|---|---|---|---|---|---|---|---|---|
| First body part | Second cell | Third cell | fourth cell | First body part | Second cell | Third cell | fourth cell | First body part | Second cell | Third cell | fourth cell | First body part | Second cell | Third cell | fourth cell |
| Second line | foo | strong | baz | Second line | foo | strong | baz | Second line | foo | strong | baz | Second line | foo | strong | baz |
| Third line | quux | baz | bar | Third line | quux | baz | bar | Third line | quux | baz | bar | Third line | quux | baz | bar |
| Second body | Second body | Second body | Second body | ||||||||||||
| 2 line | 2 line | 2 line | 2 line | ||||||||||||
| Footer row | Footer row | Footer row | Footer row |
You can add the scroll-table class to a markdown table by putting {:.scroll-table} in line directly below the table. To add the class to a HTML table, add the it to the class attribute of the table tag, e.g. <table class="scroll-table">.
Small tables
If a table is small enough to fit the screen even on small screens, you can add the stretch-table class to force a table to use the entire available content width. Note that stretched tables can no longer be scrolled.
| Default aligned | Left aligned | Center aligned | Right aligned |
|---|---|---|---|
| First body part | Second cell | Third cell | fourth cell |
An optional caption for a table
You can add the stretch-table class to a markdown table by putting {:.stretch-table} in line directly below the table. To add the class to a HTML table, add the it to the class attribute of the table tag, e.g. <table class="stretch-table">.
Just like images, you can add captions to tables by adding the figcaption class to the paragraph after the table.
An optional caption for a table
{:.figcaption}
Adding code blocks
To add a code block without syntax highlighting, simply indent 4 spaces (regular markdown). For code blocks with code highlighting, use ~~~<language>. This syntax is also supported by GitHub. For more information and a list of supported languages, see Rouge.
You can give each code block a filename, by making the first line in the block a comment of the form File: "dir/filename.ext". Use either single quotes ', double quotes ", or backticks ` to surround the filename.
Example:
// file: "code-block.js"
// Example can be run directly in your JavaScript console

// Create a function that takes two arguments and returns the sum of those
// arguments
var adder = new Function("a", "b", "return a + b");

// Call the function
adder(2, 6);
// > 8
An optional caption for a code block
Markdown:
~~~js
// file: "code-block.js"
// Example can be run directly in your JavaScript console

// Create a function that takes two arguments and returns the sum of those
// arguments
var adder = new Function("a", "b", "return a + b");

// Call the function
adder(2, 6);
// > 8
~~~

An optional caption for a code block
{:.figcaption}
DO NOT use Jekyll’s { % highlight % } ... { % endhighlight % } syntax, especially together with the linenos option. The generated table to render the line numbers does not have a CSS class or any other way of differentiating it from regular tables, so that the styles above apply, resulting in a broken page. What’s more, the output from highlight tags isn’t even valid HTML, nesting pre tags inside pre tags, which will in break the site during minification. You can read more about it here and here.
Adding math
Before adding math blocks, make sure you’ve set up math support.
Inline
Example:
Lorem ipsum .
Markdown:
Lorem ipsum $$ f(x) = x^2 $$.
Block
Example:
An optional caption for a math block
Markdown:
$$
\begin{aligned} %!!15
  \phi(x,y) &= \phi \left(\sum_{i=1}^n x_ie_i, \sum_{j=1}^n y_je_j \right) \\[2em]
            &= \sum_{i=1}^n \sum_{j=1}^n x_i y_j \phi(e_i, e_j)            \\[2em]
            &= (x_1, \ldots, x_n)
               \left(\begin{array}{ccc}
                 \phi(e_1, e_1)  & \cdots & \phi(e_1, e_n) \\
                 \vdots          & \ddots & \vdots         \\
                 \phi(e_n, e_1)  & \cdots & \phi(e_n, e_n)
               \end{array}\right)
               \left(\begin{array}{c}
                 y_1    \\
                 \vdots \\
                 y_n
               \end{array}\right)
\end{aligned}
$$

An optional caption for a math block
{:.figcaption}
KaTeX does not support the align and align* environments. Instead, aligned should be used, e.g. \begin{aligned} ... \end{aligned}.
Scripts
There are two ways of adding third party scripts. Embedding is ideal for one-off scripts, e.g. widgets.js that is part of embedded tweets (see below). Adding global scripts is for scripts that should be loaded on every page.
- this unordered seed list will be replaced by toc as unordered list
Embedding
Hydejack supports embedding third party scripts directly inside markdown content. This will work in most cases, except when a script can not be loaded on a page more than once (this will occur when a user navigates to the same page twice).
Example:
<script async src="//platform.twitter.com/widgets.js" charset="utf-8"></script>
<blockquote class="twitter-tweet" data-lang="en">
<p lang="en" dir="ltr">
The next version of Hydejack (v6.3.0) will allow embedding 3rd party scripts,
like the one that comes with this tweet for example.
</p>
— Florian Klampfer (@qwtel)
<a href="https://twitter.com/qwtel/status/871098943505039362">June 3, 2017</a>
</blockquote>
The next version of Hydejack (v6.3.0) will allow embedding 3rd party scripts, like the one that comes with this tweet for example.— Florian Klampfer (@qwtel) June 3, 2017
Global scripts
If you have scripts that should be included on every page you can add them globally by opening (or creating) _includes/my-scripts.html and adding them like you normally would:
<!-- file: `_includes/my-scripts.html` -->
<script
  src="https://code.jquery.com/jquery-3.2.1.slim.min.js"
  integrity="sha256-k2WSCIexGzOj3Euiig+TlR8gA0EmPjuc79OEeY5L45g="
  crossorigin="anonymous"></script>
my-scripts.html will be included at the end of the body tag.
Registering push state event listeners
When embedding scripts globally you might want to run some init code after each page load. However, the problem with push state-based page loads is that the load event won’t fire again. Luckily, Hydejack’s push state component exposes an event that you can listen to instead.
<!-- file: `_includes/my-scripts.html` -->
<script>
  document.getElementById('_pushState').addEventListener('hy-push-state-load', function() {
    // <your init code>
  });
</script>
Note that the above code must only run once, so include it in your my-scripts.html.
hy-push-state-start- Occurs after clicking a link.
hy-push-state-ready- Animation fished and response has been parsed, ready to swap out the content.
hy-push-state-after- The old content has been replaced with the new content.
hy-push-state-progress- Special case when animation is finished, but no response from server has arrived yet. This is when the loading spinner will appear.
hy-push-state-load- All embedded script tags have been inserted into the document and have finished loading.
If everything else fails
If you can’t make an external script work with Hydejack’s push state approach to page loading, you can disable push state by adding to your config file:
## file: `_config.yml`
hydejack:
  no_push_state: true
Build
This chapters shows how to prepare your Hydejack site for a production build and deployment on 3rd party hosting providers.
- this unordered seed list will be replaced by toc as unordered list
Building locally
When building Hydejack it is important to set the environment variable JEKYLL_ENV to production. Otherwise the output will not be minified. Building itself happens via Jekyll’s build command.
$ JEKYLL_ENV=production bundle exec jekyll build
This will generate the finished static files in _site, which can be deployed using the methods outlined in the Jekyll Documentation.
Building locally with latent semantic analysis
By default, related posts are simply the most recent posts. Hydejack modifies this a bit, by showing the most recent posts of the same category or tag. However, the results are still pretty “unrelated”. To provide better results, Jekyll supports latent semantic analysis via classifier-reborn’s Latent Semantic Indexer
To use the LSI, you first have to disable Hydejack’s default behavior, by setting use_lsi: true under the hydejack key in your config file.
## file: `_config.yml`
hydejack:
  use_lsi: true
Then, you have to run jekyll build with the --lsi flag:
$ JEKYLL_ENV=production bundle exec jekyll build --lsi
Note that this may take a long time. Once it is finished, the generated static files will be located in the _site directory, which can be deployed using the methods outlined in the Jekyll Documentation.
GitHub Pages
As of September 2024, you can deploy to GitHub Pages using a custom GitHub Action. You can read more about it in chapter Deploy.
If you’re using the Starter Kit based on the gh-pages branch, or the starter-kit-gh-pages folder from the PRO Version, all you have to do is push your repository:
$ git add .
$ git commit "Update content"
$ git push origin gh-pages
Make sure Source is set to “Deploy from a branch” in the Pages section of the repository settings, and that the branch you’ve pushed to matches the one selected in the dropdown:
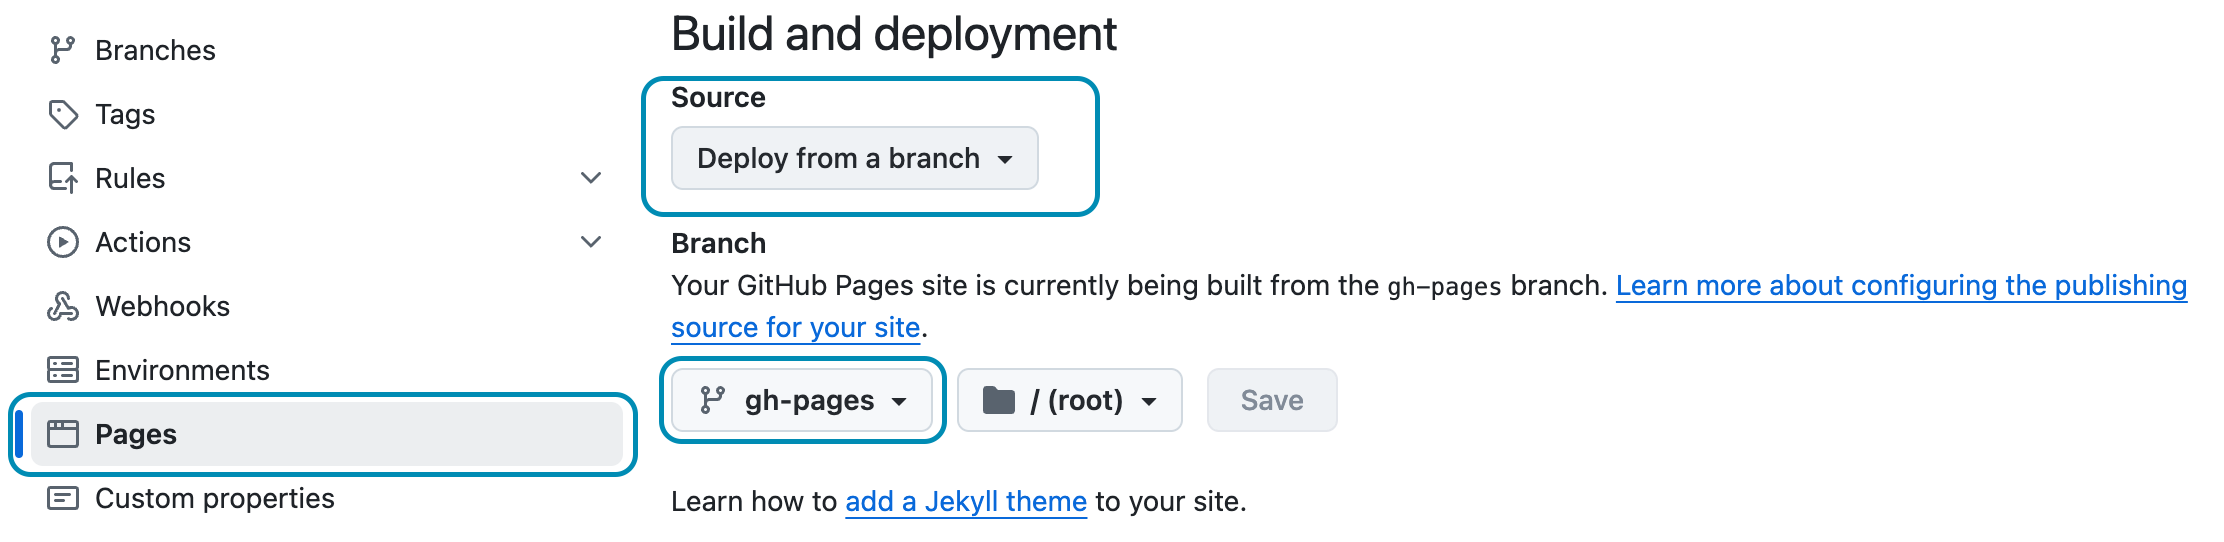
Ensure these settings are set to continue using the GitHub Pages legacy pipeline.
Deploy
This chapter was added in 2024 with my recommendations on how to deploy Hydejack based on recent developments in GitHub Pages and other changes in the world of static site deployment.
Note that the Jekyll Documentation on Deployment remains the best, most up-to-date resource for all things Jekyll deployment. These docs are my personal recipes with some extra steps that are mostly relevant to PRO Customers.
- this unordered seed list will be replaced by toc as unordered list
GitHub Actions
You can deploy to GitHub Pages from a custom GitHub Action. It allows you to fully customize the build pipeline, set specific versions for Ruby and Jekyll and use any Jekyll plugin you may wish.
To opt into the GitHub Actions pipelines, go to the repository’s settings, find the Pages tab and ensure that the Source to “GitHub Actions”:

Ensure these settings are set to opt in the GitHub Actions pipeline.
As with the legacy GitHub Pages pipeline, deployments are triggered by pushing commits to a specific branch. To set up the pipeline, create a YAML file in .github/workflows in the root of your repository with the following content:
## file: ".github/workflows/jekyll.yml"
## Sample workflow for building and deploying a Jekyll site to GitHub Pages
name: Deploy Jekyll site to Pages

on:
  # Runs on pushes targeting the default branch
  push:
    branches: [$default-branch] # You can change this to a specific branch (without the `$`)

  # Allows you to run this workflow manually from the Actions tab
  workflow_dispatch:

## Sets permissions of the GITHUB_TOKEN to allow deployment to GitHub Pages
permissions:
  contents: read
  pages: write
  id-token: write

## Allow only one concurrent deployment, skipping runs queued between the run in-progress and latest queued.
## However, do NOT cancel in-progress runs as we want to allow these production deployments to complete.
concurrency:
  group: "pages"
  cancel-in-progress: false

jobs:
  # Build job
  build:
    runs-on: ubuntu-latest
    steps:
      - name: Checkout
        uses: actions/checkout@v4
        with:
          fetch-depth: 0  # Fetch whole history for jekyll-last-modified-at plugin
      - name: Setup Ruby
        uses: ruby/setup-ruby@8575951200e472d5f2d95c625da0c7bec8217c42 # v1.161.0
        with:
          ruby-version: '3.1' # Not needed with a .ruby-version file
          bundler-cache: true # runs 'bundle install' and caches installed gems automatically
          cache-version: 0 # Increment this number if you need to re-download cached gems
      - name: Setup Pages
        id: pages
        uses: actions/configure-pages@v5
      - name: Build with Jekyll
        # Outputs to the './_site' directory by default
        run: bundle exec jekyll build --baseurl "${{ steps.pages.outputs.base_path }}"
        env:
          JEKYLL_ENV: production
      - name: Upload artifact
        # Automatically uploads an artifact from the './_site' directory by default
        uses: actions/upload-pages-artifact@v3

  # Deployment job
  deploy:
    environment:
      name: github-pages
      url: ${{ steps.deployment.outputs.page_url }}
    runs-on: ubuntu-latest
    needs: build
    steps:
      - name: Deploy to GitHub Pages
        id: deployment
        uses: actions/deploy-pages@v4
This example is based on actions/starter-workflows repository with one Hydejack-specific change applied:
The checkout step has been modified to pull the entire history of the repository. This allows the jekyll-last-modified-at plugin to generate accurate dates based on git history.
with:
  fetch-depth: 0  # Fetch whole history for jekyll-last-modified-at plugin
This GitHub Action works with any Install of Hydejack that also runs on your local machine.
Private Repo for PRO Customers
If you’re a PRO Customer and followed the instructions during Install to add the theme as a git dependency, your deploy pipeline must be authorized to pull from the private hydejack-pro repository.
## file: `Gemfile`
gem "jekyll-theme-hydejack", git: "https://github.com/hydecorp/hydejack-pro", tag: "pro/v9.2.1"
Make sure you are member of the “PRO Customers” team on GitHub. If you’ve provided a GitHub handle during checkout you should have been automatically added, otherwise you can request an invite via [email protected].
In order for Bundle to fetch the private repository, an environment variable named BUNDLE_GITHUB__COM must be set to x-access-token:<GH_REPO_PAT>, where you replace <GH_REPO_PAT> with a GitHub Personal Access Token (PAT) that has the “repo” permission.
If using a git dependency works for you, you can declutter your repository by deleting the #jekyll-theme-hydejack folder.
Most CI providers have a settings page that allows you can set environment variables. In the case of the GitHub Action above, the BUNDLE_GITHUB__COM variable is required during the “Setup Ruby” step. The modified step looks as follows:
- name: Setup Ruby
  uses: ruby/setup-ruby@8575951200e472d5f2d95c625da0c7bec8217c42 # v1.161.0
  with:
    ruby-version: '3.1' # Not needed with a .ruby-version file
    bundler-cache: true # runs 'bundle install' and caches installed gems automatically
    cache-version: 0 # Increment this number if you need to re-download cached gems
  env: #!!
    BUNDLE_GITHUB__COM: x-access-token:${{ secrets.GH_REPO_PAT }} #!!
Advanced
This chapter covers advanced topics, such as offline support and custom JS builds. Codings skills are recommended.
- this unordered seed list will be replaced by toc as unordered list
Enabling offline support
Hydejack v8 introduces experimental “cache as you go” offline support. This is implemented via the Service Worker API, a new browser standard that is now supported in the latest versions of all major browsers. However, it is a very powerful feature and should be used with a lot of care.
Enabling this feature requires that your content meets the following criteria:
- Content doesn’t change between deploys (e.g. manually adding things to
_siteetc.) - All assets in
assetsare immutable, i.e. they never change (when changing a file in assets, it needs to have a new name and links need to point to the new file). - The site is mostly self-contained, i.e. assets are served from the same domain (offline support will not download assets form external sites by default)
- The site is served via HTTPS (this is a Service Worker requirement)
To enable this feature, create a sw.js file in the root of your project and add the following content:
---
---
importScripts("{{ '/assets/js/sw.js' | relative_url }}?t={{ site.time | date_to_xmlschema }}");
This will load the main service worker script from Hydejack’s assets. The site.time part is necessary to make the service worker “byte different” every time you create a new build of your site, which triggers an update.
In your config.yml under the hydejack key, add the following:
offline:
  enabled: true
  cache_version: 1
The current implementation does not cache resources from external domains. There is now way of knowing if external sites conform to the conditions mentioned above, hence caching can be problematic and result in unexpected behavior.
For example, Google Analytics uses GET requests to send page views, each of which would be cached by the service worker without this policy. Frequently updating images, such as badges would never change.
![]()
However, if you include resources that are hosted on another domain and don’t change, you can add the sw-cache query parameter to the URL, e.g.
https://upload.wikimedia.org/wikipedia/commons/b/b1/57_Chevy_210.jpg?sw-cache
This will cause them to be cached like resources from the assets folder.
If you want to serve a file from the assets folder but NOT cache it for offline use, add the no-cache query parameter instead:
/assets/lfs/download.bin?no-cache

How offline storage works
Hydejack’s custom service worker implementation stores files for offline use on three different levels:
- Shell
- The shell files are the core Hydejack files (CSS, JS) that only change between version updates. If you made changes to any of these after enabling offline support, you must force an update by bumping the
cache_versionnumber in the config file. - Assets
- These are presumed to be immutable. In other words, every file is cached indefinitely. E.g.: If you want to update an image after enabling offline support, add the image under a different name and change the link in the content. Alternatively, you can bump the
cache_version, but this will remove all other cached files from the asset cache. - Content
- The content cache exploits the fact that your content can’t change between builds, so that it can be stored for offline use until you upload a new build. For now, the entire content cache is discarded every time you publish new content (future versions could cache them based on last modified dates).
Other things to note are that the implementation will always cache the pages listed under legal, as well as the 404.html page, which will be shown when the user is offline.
Adding a custom social media icon
Hydejack includes a number of social media icons by default (in fact, everything that is provided by IcoMoon), but since the landscape is always changing, it is likely that a platform that is important to you will be missing at some point.
You can add any platform by simply providing a complete URL. However, a fallback icon will be used.
Creating the icon font
In order to add a custom social media icon you have to use the IcoMoon App (free) to create a custom icon webfont. However, it is important that the generated font include all icons already in use by Hydejack. For this purpose, find the selection.json in assets/icomoon/selection.json and upload it to the app via “Import Icons”. Then, use the app to add your icon(s). Consult the IcoMoon docs for additional help.
Once you’ve created and downloaded the icon font form IconMoon, replace the icomoon folder in assets in its entirety. Keep in mind that future updates of Hydejack will override this folder.
Adding the platform’s metadata
For the second step it is necessary to add the network’s metadata to _data/social.yml. An entry looks like:
deviantart:
  name: DeviantArt
  icon: icon-deviantart
  prepend: "https://"
  append: ".deviantart.com"
name- The name of the network. Used for the title attribute and screen readers.
icon- The icon CSS class. Can be chosen during the IcoMoon creation process.
prepend- Optional. A string that is prepended to the username to form the link to the profile. If the final URL should be
https://<username>.deviantart.com, this would behttps:// append- Optional. A string that is appended to the username to form the link to the profile. If the final URL should be
https://<username>.deviantart.com, this would be.deviantart.com.
How CSS is organized in Hydejack
Hydejack takes a quite unique approach to CSS, which is motivated by the ability to inline essential CSS rules in a style tag in the <head/> of a page (to increase the loading speed), while serving the rest in a separate file.
The styles are written in SCSS and are located in the _sass folder, which looks like
├── hydejack
│   ├── __inline__
│   ├── __link__
│   ├── _base.pre.scss
│   ├── ...
│   └── _social.pre.scss
├── pooleparty
│   ├── __inline__
│   ├── __link__
│   ├── _base.pre.scss
│   ├── ...
│   └── _type.pre.scss
├── mixins.scss
├── my-inline.scss
├── my-style.scss
├── syntax.scss
└── variables.scss
The style rules are organized alongside components (or rather, topics) like “sidebar” and “footer”. Further, there are two separate frameworks, “pooleparty” and “hydejack”, which grew out of the original Poole and Hyde projects. Poole/party contains more general style rules, while Hyde/jack contains those that more are specific to the theme. However, this separation has blurred over time.
Inside those folders, you will notice the __inline__ and __link__ folders. The unfriendly names are intentional, because their contents are generated by a script and shouldn’t be modified directly. The source files are located in the same folder and end with .pre.scss. They are fully valid SCSS files, but contain comments that mark which lines should be inlined and which should be fetched asynchronously.
The rules are as follows:
- Every line between
// <<< inlineand// >>>will be inlined - Every line between
// <<< linkand// >>>will be linked - Every line that isn’t contained in a block and ends with
// inlinewill be inlined - Every line that isn’t contained in a block and ends with
// linkwill be linked - Every line for which none of the above applies will be included in both.
The actual splitting happen with the .scripts/build-css.sh script (requires node.js 8+). You can run the script once by using
$ npm run build:css
or rebuild the CSS on every file change
$ npm run watch:css
Note that my-inline.scss and my-style.scss are not affected by this. Also, since all files are valid SCSS, the splitting part is entirely optional. If you would like to build just one regular CSS file, add
hydejack:
  no_inline_css: true
to your config file.